Serialization with Dataclasses Avro Schema

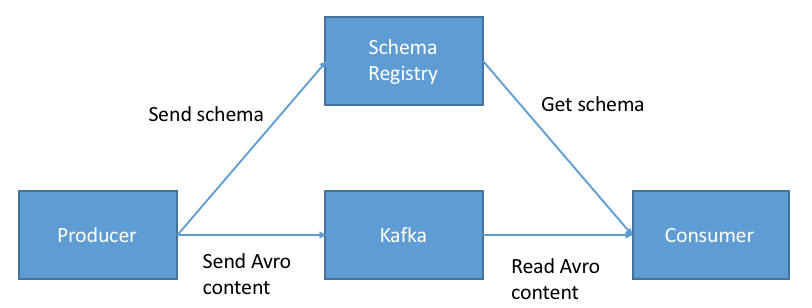
Last year I released the project Dataclasses Avro Schema in wich the main goal was to generate avro schemas from python dataclass. Thanks to this main feature, is possible to serialize/deserialize python instances using the self contain avro schemas. For example, we can serialize python instances in order to create events and place them (binary) in kafka topics or redis streams and also we can deserialize the events and convert them into the original python instances. This is a powerful feature, because the data layer for streaming application is full covered with this library, meaning that you can use your favorite python kafka driver or python redis driver to built streaming application without worries of the data model.

Serialization

Serialization can be done using avro, avro-json or json on a python instance:

from dataclasses import dataclass

import typing

from dataclasses_avroschema import AvroModel


@dataclass
class Address(AvroModel):
    "An Address"
    street: str
    street_number: int


address_data = {
    "street": "test",
    "street_number": 10,
}

# create an Address instance
address = Address(**address_data)

address.serialize()
# >>> b'\x08test\x14'

address.serialize(serialization_type="avro-json")
# >>> b'{"street": "test", "street_number": 10}'

# Get the json from the instance

address.to_json()
# python dict >>> {'street': 'test', 'street_number': 10}

Deserialization

Deserialization can be done as well with avro or avro-json. You must know beforehand which one you should use

avro_binary = b'\x08test\x14'  # Address instance serialized with avro
Address.deserialize(avro_binary)  # create a python instance of Address
# >>>> Address(street='test', street_number=10)

avro_json = b'{"street": "test", "street_number": 10}'  # Address instance serialized with avro-json
Address.deserialize(avro_json, serialization_type="avro-json")  # create a python instance of Address
# >>>> Address(street='test', street_number=10)

Examples with kafka and redis drivers

You can create simple straming applications using your favorite python driver either kafka or redis and integrate producers and consumers with dataclasses-avroschema. The following is a minimal example using aiokafka:

import asyncio
from dataclasses import dataclass
import random

from aiokafka import AIOKafkaConsumer, AIOKafkaProducer

from dataclasses_avroschema import AvroModel, types


@dataclass
class UserModel(AvroModel):
    "An User"
    name: str
    age: int
    favorite_colors: types.Enum = types.Enum(["BLUE", "YELLOW", "GREEN"], default="BLUE")
    country: str = "Argentina"
    address: str = None

    class Meta:
        namespace = "User.v1"
        aliases = ["user-v1", "super user"]


async def consume(loop, total_events=10):
    consumer = AIOKafkaConsumer(
        'my_topic', 'my_other_topic',
        loop=loop, bootstrap_servers='localhost:9092',
        group_id="my-group")
    # Get cluster layout and join group `my-group`
    await consumer.start()
    run_consumer = True

    while run_consumer:
        try:
            # Consume messages
            async for msg in consumer:
                print(f"Message received: {msg.value} at {msg.timestamp}")

                user = UserModel.deserialize(msg.value)
                print(f"Message deserialized: {user}")
        except KeyboardInterrupt:
            # Will leave consumer group; perform autocommit if enabled.
            await consumer.stop()
            print("Stoping consumer...")
            run_consumer = False


async def send(loop, total_events=10):
    producer = AIOKafkaProducer(
        loop=loop, bootstrap_servers='localhost:9092')
    # Get cluster layout and initial topic/partition leadership information
    await producer.start()

    for event_number in range(1, total_events + 1):
        # Produce message
        print(f"Sending event number {event_number}")

        user = UserModel(
            name=random.choice(["Juan", "Peter", "Michael", "Moby", "Kim",]),
            age=random.randint(1, 50)
        )

        # create the message
        message = user.serialize()

        await producer.send_and_wait("my_topic", message)
        # sleep for 2 seconds
        await asyncio.sleep(2)
    else:
        # Wait for all pending messages to be delivered or expire.
        await producer.stop()
        print("Stoping producer...")


if __name__ == "__main__":
    loop = asyncio.get_event_loop()
    tasks = asyncio.gather(send(loop), consume(loop))

    loop.run_until_complete(tasks)

Under examples folder you can other two kafka examples (sync) using the kafka-python driver, where the avro-json serialization and schema evolution (FULL compatibility) is shown. Also, there are two redis examples using redis streams with walrus and redisgears-py

Factory and fixtures

Dataclasses Avro Schema also includes a factory feature, so you can generate fast python instances and use them, for example, to test your data streaming pipelines. Instances can be genrated using the fake method.

import typing

from dataclasses_avroschema import AvroModel


class Address(AvroModel):
    "An Address"
    street: str
    street_number: int

class User(AvroModel):
    "User with multiple Address"
    name: str
    age: int
    addresses: typing.List[Address]


Address.fake()
# >>>> Address(street='PxZJILDRgbXyhWrrPWxQ', street_number=2067)

User.fake()
# >>>> User(name='VGSBbOGfSGjkMDnefHIZ', age=8974, addresses=[Address(street='vNpPYgesiHUwwzGcmMiS', street_number=4790)])

Conclusion

If you are starting a straming python application, give it a try to Dataclasses Avro Schema in order to cover the data model layer, and avoid headaches at the moment of serializarion/deserialization process.

Dataclasses Avro Schema

If you are immerse in the data streaming world, probably you had faced the serialization problem. There are different techniques/frameworks to achieve this, for example Thrift, Protocol Buffers or Apache Avro.

Personally, I am using Avro serialization and I always had to came up with avro schemas based on desired payload keeping in mind fields specification and attributes. This is not a heavy task for simple uses cases, but when we have complex types, data relationships (nested schemas) or custom types the process gets a bit complicated. I asked myself, what if we can generate the avro schemas based on a python class? Most of the time the desired payload that we want get after deserialization is based on a Python class. The ending results was:

Dataclasses Avro Schema, Generate Avro Schemas from a Python class 😀

Let's see an example. Suppose that we want an avro schema that represents a User:

{
    "type": "record",
    "name": "User",
    "fields" : [
        {"name": "name", "type": "string"},
        {"name": "age", "type": "int"},
        {"name": "has_pets", "type": "boolean"},
        {"name": "money", "type": "float"}
    ],
    "doc": "User(name: str, age: int, has_pets: bool, money: float)"
}

Instead of remember all fields specifications, we can write the python class to get the schema:

from dataclasses_avroschema.schema_generator import SchemaGenerator

class User:
    name: str
    age: int
    has_pets: bool
    money: float

SchemaGenerator(User).avro_schema()

{
  "type": "record",
  "name": "User",
  "fields": [
    {"name": "name", "type": "string"},
    {"name": "age", "type": "int"},
    {"name": "has_pets", "type": "boolean"},
    {"name": "money", "type": "float"}
  ],
  "doc": "User(name: str, age: int, has_pets: bool, money: float)"
}'

Super simple and straightforward. We have all this features:

  • Primitive types: int, long, float, boolean, string and null support
  • Complex types: enum, array, map, fixed, unions and records support
  • Logical Types: date, time, datetime, uuid support
  • Schema relations (oneToOne, oneToMany)
  • Recursive Schemas
  • Generate Avro Schemas from faust.Record

So, if you need an avro schema, give a chance to dataclasses-avroschema 😉

Python Schema Registry Client

Businesses collect large amounts of data, and data can be analized in real time. Usually, we use Kafka and a framework such us Flink or Faust to proccess data, but we do not include a way to validate it. This is why Thrift, Protocol Buffers and Apache Avro were developed. In this post I want to talk about Avro Schemas and how to integrate them with Faust.

Apache Avro and Avro Schemas?

Avro is a row-oriented remote procedure call and data serialization framework developed within Apache's Hadoop project. It uses JSON for defining data types and protocols, and serializes data in a compact binary format. Its primary use is in Apache Hadoop, where it can provide both a serialization format for persistent data, and a wire format for communication between Hadoop nodes, and from client programs to the Hadoop services. Avro uses a schema (avro schema) to structure the data that is being encoded. It has two different types of schema languages; one for human editing (Avro IDL) and another which is more machine-readable based on (JSON).

It is similar to Thrift and Protocol Buffers, but does not require running a code-generation program when a schema changes (unless desired for statically-typed languages).

Avro Schema example:

{
   "namespace": "example.avro",
   "type": "record",
   "name": "User",
   "fields": [
      {"name": "name", "type": "string"},
      {"name": "favorite_number",  "type": ["int", "null"]},
      {"name": "favorite_color", "type": ["string", "null"]}
   ] 
 }

Now that we know avro schemas are, we should talk about where they are stored. We need a place where producers and cosumers can get them, and this is why a Schema Registry exist. The Confluent Schema Registryis a schema management that taht provides a RESTful interface for storing, serving and versioning schemas.

Scenario

We could think about a producer that uses a schema to serialize data and compact it into a binary representation and a consumer that deserialize the binary to get the original data cheking it with the corresponding schema.

Confluent Architecture

The producer and consumer have to serialize/deserialize messages using the Schema Registry every time that they send/receive events to/from Kafka topics. We can imagine the producer and consumer as Faust application that are able to interact with the Schema Registry Server. In order to achive this, I have created Python Schema Registry Client

A Python Rest Client to interact against schema-registry confluent server to manage Avro Schemas resources. Also, has a MessageSerializer in order to serialize/deserialize events using avro schemas.

Faust Integration

Asumming that you know Faust, we need to define a custom codec and a custom serializer to be able to talk with the Schema Registry, and to do that, we will use the MessageSerializer.

For the demonstration, let's imagine that we have the following schema:

{
    "type": "record",
    "namespace": "com.example",
    "name": "AvroUsers",
    "fields": [
        {"name": "first_name", "type": "string"},
        {"name": "last_name", "type": "string"}
    ]
}

Let's register the custom codec:

# codecs.codec.py
from schema_registry.client import SchemaRegistryClient, schema
from schema_registry.serializers import FaustSerializer

# create an instance of the `SchemaRegistryClient`
client = SchemaRegistryClient(url=settings.SCHEMA_REGISTRY_URL)

# schema that we want to use. For this example we 
# are using a dict, but this schema could be located in a file called avro_user_schema.avsc
avro_user_schema = schema.AvroSchema({
     "type": "record",
     "namespace": "com.example",
     "name": "AvroUsers",
     "fields": [
       {"name": "first_name", "type": "string"},
       {"name": "last_name", "type": "string"}
     ]
})

avro_user_serializer = FaustSerializer(client, "users", avro_user_schema)


# function used to register the codec
def avro_user_codec():
    return avro_user_serializer

and in setup.py the following code in order to tell faust where to find the custom codecs.

# setup.py

setup(
    ...
    entry_points={
        'console_scripts': [
            'example = example.app:main',
        ],
        'faust.codecs': [
            'avro_users = example.codecs.avro:avro_user_codec',
        ],
    },
)

Now the final step is to integrate the faust model with the AvroSerializer:

# users.models

class UserModel(faust.Record, serializer='avro_users'):
    first_name: str
    last_name: str
# users.agents.py
import logging

from your_project.app import app
from .codecs.codec import avro_user_serializer
from .models import UserModel

users_topic = app.topic('avro_users', partitions=1, value_type=UserModel)

logger = logging.getLogger(__name__)


@app.agent(users_topic)
async def users(users):
    async for user in users:
        logger.info("Event received in topic avro_users")
        logger.info(f"First Name: {user.first_name}, last name {user.last_name}")


@app.timer(5.0, on_leader=True)
async def publish_users():
    logger.info('PUBLISHING ON LEADER FOR USERS APP!')
    user = {"first_name": "foo", "last_name": "bar"}
    await users.send(value=user, value_serializer=avro_user_serializer)

Now our application is able to send and receive message using arvo schemas!!!! :-) You can take a look the code example here

Cookiecutter Faust

Businesses collect large amounts of data, and data experts can extract actionable insights and learn from it. Because we can leverage data in real time, employing data streaming and processing, insights can be discovered almost instantly.

Tools like Kafka Streams, Apache Spark, and Flink are used for this propouse, but mainly with support for Java and Scala.

Recently, a new framework was born for the Python world: Faust.

Faust is a stream processing library, porting the ideas from Kafka Streams to Python. It is used to build high performance distributed systems and real-time data pipelines that process billions of events every day. Faust provides both stream processing and event processing, sharing similarity with tools such as Kafka Streams, Apache Spark/Storm/Samza/Flink, It does not use a DSL, it’s just Python! This means you can use all your favorite Python libraries when stream processing: NumPy, PyTorch, Pandas, NLTK, Django, Flask, SQLAlchemy, ++ Faust requires Python 3.6 or later for the new async/await syntax, and variable type annotations.

In order to use a data streaming technology, we need to set up a broker, for example kafka, and kafka needs zookeeper, and this is when we start struggling a bit because the different parts have to be installed and configured in order to play together. Indeed, we can go further, and use services like Schema Registry and Rocks DB to make more robust our stack, and again, we need to spend time configuring them.

So, I have created a small project called cookiecutter-faust: A Cookiecutter template for creating Faust projects quickly, means that all the necessary services are pre-configured and the project skeleton is generated for you.

The requirements are cookiecutter, Docker and Docker Compose.

Features

  • For Faust 1.5.4
  • Python 3.6 and 3.7
  • Docker and docker-compose support
  • Useful commands included in Makefile
  • Project skeleton is defined as a medium/large project according to faust layout
  • The setup.py has the entrypoint in order to solve the entrypoint problem in Faust
  • Include a settings.py as Django
  • Include an App example with tests

Usage

Is super easy. First, we need to install coockicutter.

pip install "cookiecutter>=1.4.0"

Then, just run:

cookiecutter https://github.com/marcosschroh/cookiecutter-faust

and answer the prompts with your desired option:

project_name [My Awesome Faust Project]: super faust
project_slug [super_faust]:
description [My Awesome Faust Project!]:
long_description [My Awesome Faust Project!]:
author_name [Marcos Schroh]:
author_email [marcos-schroh@gmail.com]:
version [0.1.0]:
Select open_source_license:
1 - MIT
2 - BSD
3 - GPLv3
4 - Apache Software License 2.0
5 - Not open source
Choose from 1, 2, 3, 4, 5 (1, 2, 3, 4, 5) [1]:
use_pycharm [n]:
use_docker [n]: y
include_docker_compose [n]: y
include_page_view_tutorial [n]: y
worker_port [6066]:
kafka_server_environment_variable [KAFKA_BOOTSTRAP_SERVER]:
include_codec_example [y]:
Select faust_loglevel:
1 - CRITICAL
2 - ERROR
3 - WARNING
4 - INFO
5 - DEBUG
6 - NOTSET
Choose from 1, 2, 3, 4, 5, 6 (1, 2, 3, 4, 5, 6) [1]: 4

and now you are ready to start coding your Data Streaming application without spending time on configurations!

The full Documentation is here

Continuous Integration with Gitlab

In this post, I want to talk about how we can automate our integration process using the Gitlab army tool. More specifically, how we can create a new release of our software, update the corresponding files that reflects the version, and create a new docker image.

For this example, we have a python/django application and Docker as containerization tool.

Goals:
  • Bump a new version every time that a change occurs on master branch. The bump should be executed automatically by the CI process.
  • Create a new docker image that contains the latest changes and push it to the registry.
Defining a CI Pipeline

Starting a CI process in gitlab is super easy, you just need a .gitlab-ci.yaml file that contains stages and jobs configurations. You can find more info here.

For our case purpose, we define three stages with one job each one.

  1. Test the application.
  2. Auto bump the version. Means changing the file/s that reflects the version, creating a new commit and git tag.
  3. Create a new docker image and publish it in Gitlab registry.

gitlab variables

Assumptions and Development Workflow:

Define a clear development workflow is crucial for our goal. It gives a clear vision and a tidy way about how developers should work. We have defined the following the flow and probably you are familiar with it:

  1. A developer creates a new commit on any branch (except master)
  2. A developer creates a merge request (MR) against master
  3. When the MR is accepted and merged, the 3 stages of the CI are executed

Some Assumptions:

  1. Master branch is protected, means that nobody can push to it, except Gitlab runners.
  2. The test job runs on every branch when a change is detected.
  3. We use semantic version.
  4. For every commit message, we use a convention.
  5. You can use any tool that you want, in our case we use commitizen
  6. For simplification, we store the version in a file called VERSION. You can use any file that you want as commitizen supports it.
  7. The commit message executed automatically by the CI must include [skip-ci] otherwise the process will be executed in a loop. You can define the message structure in commitizen as well.
Gitlab Configuration:

In order to be able to change files and push new changes with Gitlab runners, we need to have a ssh key and configure a git user.

First, let's create a ssh key. The only requirement is to create it without a passphrase.

ssh-keygen -f deploy_key -N ""

The previous command will create a private and public key under the files deploy_key and deploy_key.pub. We will use them later.

For the git user, we need an email and username. You can choose whatever you want, in this example, we choose ci-runner@myproject.com and admin respectively.

Now, we need to create three environment variables that will be visible for the runners. They should be created in the variables section under settings/ci_cd:

gitlab variables

Create SSH_PRIVATE_KEY, CI_EMAIL, CI_USERNAME variables and fill them with the private_key, email and username that we have created.

An important thing is to unprotect the private key, otherwise, the CI will raise errors.

The latest step is to create a deploy key. To do this, we should create a new one in the section settings/repository and fill it with the public key generated before. Check Write access allowed, otherwise, the runner won't be able to write changes to the repository.

gitlab deploy key

If you have more projects under the same organization, you can reuse the deploy key created before, but you will have to repeat the step where we created the environment variables (ssh key, email, and username).

Start CI pipeline:

Let's start with a basic configuration for our pipeline:

image: docker:latest

services:
  - docker:dind

variables:
  API_IMAGE_NAME: $CI_REGISTRY_IMAGE:$CI_COMMIT_REF_NAME

before_script:
  - apk add --no-cache py-pip
  - pip install docker-compose

stages:
  - test
  # - auto-bump # both stages will use later
  # - publish

test:
  stage: test
  script:
    - docker-compose run -e DJANGO_ENVIRONMENT=dev your_project python manage.py test

So, every time that a developer push to any branch the test job will be executed.

Time for the bumping. Below, we are defining a new job to auto bump a new version. The important steps are setting the ssh key, configure git, execute the auto bump command, push to master branch and upload the new version to gitlab artifacts. See the comments next to each line:

auto-bump:
  stage: auto-bump
  image: python:3.6
  before_script:
    - 'which ssh-agent || ( apt-get update -qy && apt-get install openssh-client -qqy )'
    - eval `ssh-agent -s`
    - echo "${SSH_PRIVATE_KEY}" | tr -d '\r' | ssh-add - > /dev/null # add ssh key
    - pip3 install -U Commitizen # install commitizen
    - mkdir -p ~/.ssh
    - chmod 700 ~/.ssh
    - echo "$SSH_PUBLIC_KEY" >> ~/.ssh/id_rsa.pub
    - '[[ -f /.dockerenv ]] && echo -e "Host *\n\tStrictHostKeyChecking no\n\n" > ~/.ssh/config'
  dependencies:
    - test
  script:
    - git remote set-url origin git@gitlab.com:discover/rentee-core.git # git configuration
    - git config --global user.email "${CI_EMAIL}" && git config --global user.name "${CI_USERNAME}"
    - 'exists=`git show-ref refs/heads/master` && if [ -n "$exists" ]; then git branch -D master; fi'
    - git checkout -b master
    - cz bump # execute auto bump and push to master
    - git push origin master:$CI_COMMIT_REF_NAME
    - TAG=$(head -n 1 VERSION) # get the new software version and save into artifacts
    - echo "#!/bin/sh" >> variables
    - echo "export TAG='$TAG'" >> variables 
    - git push origin $TAG
  only:
    refs:
      - master
  artifacts:
    paths:
    - variables

Now, let's add the publish job to create a new docker image and push it to the registry:

publish:
  stage: publish
  dependencies:
    - test
    - auto-bump
  script:
    - source variables # loading environment variables from artifact
    - echo $TAG
    - API_IMAGE_TAG="${CI_REGISTRY_IMAGE}:${TAG}"
    - docker login registry.gitlab.com -u ${CI_REGISTRY_USER} -p ${CI_REGISTRY_PASSWORD} # Authenticating against registry registry
    - docker build -t $API_IMAGE_NAME your_project # creating docker image
    - docker tag $API_IMAGE_NAME $API_IMAGE_TAG
    - docker push $API_IMAGE_TAG # pushing to docker registry
  only:
    refs:
      - master

Because we can not pass variables between jobs, we are using artifacts. You can avoid using artifacts configuring git again in the latest job, then pull the latest changes that include the last commit that bumps the version or simply combining auto-bumping and publish into one job.

After merging with master we have the final result:

gitlab final ci result

Let's help version controls

As developers sometimes we don't realize the amount of work that a control version has to do in order to calculate diffs, so what can we do about it in order to help them and make our teammate's life easier?

A control version is ...

According to Wikipedia is the management of changes to documents, computer programs, large web sites, and other collections of information. Somehow, these guys have to track and compare every change that we made, crazy eh!

Complacent comma placement

Let's imagine that we have the following python list and we are using git as our control version tool:

my_list = ["banana", "orange", "apple"]

Whenever you make a change to the list, it will be hard to tell what was modified by looking at git diff. Because of most of the source control system are line-based they have a hard time highlining multiple changes to a single line

A quick fix is to adopt a code style where you spread out list, dict or set constants across multiple lines, so we have one item per line:

my_list = [
    "banana",
    "orange",
    "apple"
]

Now, is perfectly clear when one item was added, removed or modified using a git diff.

As a bonus, let's say that you add anana at the end of the list, you commit but you can not push because you are not in the latest version. Make a pull and there is a conflict because your teammate has added pear at the end of the list:

my_list = [
    "banana",
    "orange",
    "apple",
    "anana" # <-- missing comma
    "pear"
]

Seems really clear here that you have to add a comma after anana to avoid string literal concatenation, but it happened to me a lot of times that I was focused on trying to solve the merge conflict and I forgot the COMMA!! Just for a missing comma and we have unexpected results.

So, as python developer we can adopt a code style that we place a comma after every item in a list, dict or set constants including the last item to avoid silly mistakes in merge conflicts.

my_list = [
    "banana",
    "orange",
    "apple",
    "anana",
    "pear",
]

Unfortunately, not always we can do this, for example in json:

{
    "firstName": "Foo",
    "lastName": "Bar", // <--  SyntaxError: Unexpected token } in JSON at position ...
}

Space at the end

Why are line breaks important?

Version control systems are focused on text files; they can track the changes, merge files automatically, or facilitate the process of resolving conflicts. Because of this, line endings are crucial in understanding the content of the file and how to work with the changes (most of them do merges on a line by line basis).

For example, Git supports both CR+LF and LF line endings using several configuration options.

Git's default merge strategy will throw a conflict whenever two branches make changes to adjacent (or the same) lines. This is eminently sensible: when changes are made, neighboring lines are needed to give them context – simply merging changes when their context has also changed won't always give the desired result.

Let's imagine that we have a file called foo.txt and we add the word python without an ending line:

If run git diff we have the following message:

diff --git a/marcosschroh/foo.txt b/marcosschroh/foo.txt
index e69de29..d8654aa 100644
--- a/marcosschroh/foo.txt
+++ b/marcosschroh/foo.txt
@@ -0,0 +1 @@
+python
\ No newline at end of file

So far so good, we decide to commit and push. After a while, is time to add a new word to our foo file and we write test with a new line at the end. What do you think we will get after running git diff?

diff --git a/marcosschroh/foo.txt b/marcosschroh/foo.txt
index d8654aa..4215a2c 100644
--- a/marcosschroh/foo.txt
+++ b/marcosschroh/foo.txt
@@ -1 +1,2 @@
-python
\ No newline at end of file
+python
+test

but why? If I just added the word test and not python? Don't panic, the first line shows up in the diff as modified although there is no visible change because newlines are a control character and therefore don't have a visible representation.

Now, what would have the output of git diff if we had added a new line at the end of python and after we add the test word?

diff --git a/marcosschroh/foo.txt b/marcosschroh/foo.txt
index fdc793e..4215a2c 100644
--- a/marcosschroh/foo.txt
+++ b/marcosschroh/foo.txt
@@ -1 +1,2 @@
 python
+test

Cleaner and easier, right?

Conslusion:

Adapting smart formattings like spread out list, dict or set constants across multiple lines and adding a comma at the end of each item including the last one is easier to maintain and avoid bugs. Always add a new line at the end, it will make life easier to your teammates and for version control tools.

Manage asynchronous errors with React and Formik

In this posts, I want to show you one approach to manage errors when we perform asynchronous actions with React.js

Just to remember, I am using the architecture that I commented on my previous post Creating your own framework with React

I've tried several forms libraries in React and one that has accomplished most of the requirements is Formik. It does not have several issues, the repository is updated quite often, the community is active, and in my case, It was clear how to use it.


Architecture

This is the architecture that I've decided to use:

simple image-routes

One important thing is we have only one reducer (Error Reducer) to store all the errors related to the forms that we have in our project. Also, there is a FieldError component that knows how to show the errors.

Let's write code:


Our Form Smart Component with Formik

import React from 'react';
import { Field, Formik } from 'formik';

import FieldError from '../../../components/FieldError';

class LoginForm extends React.Component {

  constructor(props) {
    super(props);
    this.initialValues = {
      email: '',
      password: '',
    };
  }

  render() {
    return (
      <Formik 
        initialValues={this.initialValues}
        onSubmit={(values, options) => {
          this.props.handleSubmit(values)
        }}
      render={(props) => {
        return <form onSubmit={props.handleSubmit} >
          <label htmlFor="email">Email</Label>
          <input type="email" name="email" id='email'required/>

          <FieldError errors={this.props.errors.email} />

          <label htmlFor="password">Password:</label>
          <input type="password" name="password" id='password' required/>

          <button type="submit">Login</button>
        </form>
      }}
    />
    )
  }
}

export default LoginForm


Our FieldError component

import React from 'react';
import PropTypes from 'prop-types';


class FieldError extends React.Component {

  static propTypes = {
    errors: PropTypes.array,
    globalInForm: PropTypes.bool
  };

  static defaultProps = {
    errors: [],
    globalInForm: false
  }

  render() {
    let errors = this.props.errors.map((error, key) => (
      <p className="error text-danger" key={key}>{error}</p>
    ))

    if (errors.length && this.props.globalInForm){
      return (
        <div color="danger">
          <ul>{errors}</ul>
        </div>
      )  
    }

    return (
      <div>
        {errors}
      </div>
    )
  }
}

export default FieldError


Our Error Reducer

import actionTypes from '../actions/actionTypes';

const initialState = {
  formErrors: [],
  globalErrros: [],
  messages: []
}

export default function reducer(state=initialState, action) {
  switch (action.type) {

  case actionTypes.ADD_FORM_ERRORS:

    return {
        ...state,
        formErrors: action.payload.errors,
     }

  case actionTypes.RESET_FORM_ERRORS:

    return {
        ...state,
        formErrors: [],
      } 

  default:
    return state
  }
}


Sagas funtions

import { takeEvery } from 'redux-saga';
import { call, put } from 'redux-saga/effects';
import actionTypes from '../actions/actionTypes';
import api from '../../api';

function * login(action) {
  try{
    const response = yield call(api.login, action.payload.data, );
    yield put({ type: actionTypes.LOGIN_SUCCESSFUL, payload: response })
    yield put({ type: actionTypes.RESET_FORM_ERRORS });

  } catch(response) {
    yield put({ type: actionTypes.ADD_FORM_ERRORS, payload: {errors: response.errors} });
  }
}

export function * userSagas() {
  yield [
    takeEvery(actionTypes.LOGIN_REQUESTED, login)
  ]
}


Linking Error Reducer with our Form and actions

import { connect } from 'react-redux'
import LoginForm from './components/LoginForm';
import { login } from '../../store/actions';

const mapStateToProps = (state) => {
  return {
    errors: state.errorReducer.formErrors
  }
}

const mapDispatchToProps = (dispatch) => {
  return {
    login: (data) => {
      dispatch(login(data))
    }
  }
}

const LoginContainer = connect(
    mapStateToProps,
    mapDispatchToProps
)(LoginPage)

export default LoginContainer


In the above code, we can observe that the form component have access to a portion of the store (error Reducer), also when the form is submitted the login action is dispatched.

Important thngs:

Is important to know the response format that comes from the server. In our case the expected format is:

{
    'field_1': [
        'error_1', 'error_2'
    ],
    'field_2': [
        'error__1', 'error_2'
    ]
}

So, our Form will have access to the above error object, and then will pass each array to the FieldError component to show them.

<FieldError errors={this.props.errors.email} />

If there is no error in the response, we should clean the reducer because the same reducer is used by multiple forms.

Another thing is when the user refresh the page, we also should clean the ErrorReducer, otherwise, the errors will be there and can cause confusion.


The flow:

  1. User fill the form and press submit (login function is called).
  2. Because is an async action, the sagas middleware catch it, and send a request to the backend.
  3. The server has responded with an error e.g. 400.
  4. The errors are registered in the Error Reducer by sagas.
  5. The form is listening to the Error Reducer and have access to it.
  6. The errors are shown in the form.


Conclusion:

Showing async errors is not an easy task in React, but after a clear workflow was established and the structures to play (Reducer and FieldError) have been created showing errors becomes easier.

Also, I've seen the approach of creating one Reducer per Form, in our case LoginForm Reducer belongs to the login form, RegistrationForm Reducer to Registration Form, etc. Maybe is a good approach to have a better control of each form but the amount of reducer increase considerably.

Pyinstamation

What is Pyinstamation?

Pyinstamation is a Python Bot for Instagram. I have developed this project with Santiago Fraire. You can take a look of the source code of Pyinstamation here

Features:

  • You can configure however you want the bot.
  • Works in Linux and MacOS.
  • Works in Chrome and Firefox.
  • Upload pictures.
  • Farm followers with the follow/unfollow technique.
  • Like and comment by tags.
  • Metrics persisted in db.
  • Logging.
  • Comment generator.

Everything looks great so far, but here, I want to show you about the results I had with this bot. I've been running this bot for 5 days in a row, once a day at the same time, and the results were quite good.

First I will show you the configuration I used for teh 5 days:

username: yourusername
password: yourpassword
hide_browser: false
browser_type: chrome

posts:
  search_tags: ['hashtag_1', 'hashtag_2', 'hashtag_3', 'hashtag_4', 'hashtag_5',]
  ignore_tags: []
  posts_per_day: 100
  likes_per_day: 50
  like_probability: 0.5
  comments_per_day: 10
  comment_enabled: true
  comment_generator: true
  comment_probability: 0.5
  custom_comments: []
  total_to_follow_per_hashtag: 10

followers:
  follow_enable: true
  min_followers: 0
  max_followers: 0
  follow_probability: 0.5
  ignore_users: []
  follow_per_day: 50
  unfollow_followed_users: true


And here are the results per day:

Day Likes Given Likes Gain Comments made Comments gained My comments liked Mentions New users following New Followers Users Unfollowed
1 15 4 10 0 1 0 15 13 0
2 19 3 10 0 5 2 23 11 0
3 13 3 10 3 7 2 15 1 15
4 47 15 10 0 1 1 47 20 10
5 46 3 10 0 3 0 10 13 15


Some numbers:

New Followers: 13 + 11 + 1 + 20 + 13 = 58

New Users Following: (15 + 23 + 15 + 47 + 10) - (0 + 0 + 15 + 10 + 15) = 70

Is important to note that we only unfollow the users that have been followed by the bot


Ok. So I was wondering whether the bot has achieved its goal or not? Well, my main goal was: have more followers with the follow/unfollow technique

If we analize the bot from the goal perpective, we can say that it's working because I have more Followers, actually 47. Of course this result also dependes on the configuration that I've set: likes per days, comments, probabilities. etc.

But if we define the FR (Follow Rate) as followers/following, that is not good because I'm following more users than before, to be exact 70. So, the FR = 58/70 = 0.8285

We have more followers, but at the same time I'm following more users (bad rate) and I can guess that in the most of the cases a person wants to have a lot of followers but with a good rate (following << followers).

When we developed this project, Instagram had a limit of 7500 people that you can follow, so it’s means that if we run this bot indefinetely we can reach this number, but the good thing is that we don’t have any limit about followers.

Let’s suppose that we start with 100 followers and 100 users following.

Regarding the results that we had, we can say that:

Followers average per running: 58 / 5 = 11.6

New Users Following per running: 70 / 5 = 14

If we do some math we can says that:

I will reach the 7500 limit of user following around: (7500 - 100) / 14 = 528 running

I will reach the 7500 limit of followers around: (7500 - 100) / 11.6 = 637 running

So, I will have a FR = 1 around the running 637.


simple image1


If everything goes well and I keep running the bot I will have a FR > 1 after the running 637 times.

Probably is too much time If I run the bot once per day!!!

Conclusion:

I think the bot has achieved the goal. You will have to wait too much for a good RATE if you run the bot once a day with the same configuration.

What can you do to improve the Rate:

  • Look at popular hashtags.
  • Increase the amount of comments and likes per day.
  • Do not Follow too much people per day
  • Create posts per day.
  • Increase comment and like probability.
  • Run the bot multiple times per day.
  • Avoid unpopular hashtags

PD: If you have any issue or a new feature request don't hesitate to tell us!!. You can do it on our pyinstamation repo

Testing a Form Wizard in Django

I was writing a couple to tests form my django views and I got stuck with a Form Wizard. I tought.. well I will need to iterate over a form list and make several post as many steps as the wizard has. That assumetion was correct, so I created the data for every form, I create a form loop... and bump, It didn't work.

return handler(request, *args, **kwargs)
File "/home/marcos/.virtualenvs/platformv3/local/lib/python2.7/site-packages/formtools/wizard/views.py", line 284, in post code='missing_management_form',
ValidationError: [u'ManagementForm data is missing or has been tampered.']


It didn't work because like we can see in the Traceback a wizard also need management_form. Basically, I was makeing a post with the data for each form but of course teh Wizard needs to know wich step are you refering to. So, let's go to the real example.

Let's imagine that these are my Forms.

class TicketInfoForm(forms.Form):
    limit = forms.IntegerField(min_value=1)
    name = forms.CharField()
    pub_date = forms.DateTimeField()

class AddressForm(forms.Form):
    street_name = forms.CharField()
    zipcode = forms.CharField()
    city = forms.CharField()
    country = forms.CharField()


My views.py file

from django.shortcuts import redirect

from formtools.wizard.views import SessionWizardView

from .forms import TicketInfoForm, AddressForm

TICKETS_INFO_WIZARD_FORMS = (
    ("Ticket Information", TicketInfoForm),
    ("Address", AddressForm)
)

class TicketWizardFormView(SessionWizardView):
    template_name = 'tickets_info.html'

    def done(self, form_list, **kwargs):
        ticket_info_form, address_form = form_list

        address = address_form.save(commit=False)
        address.type = BUYER_ADDRESS
        address.save()

        tickets_info = tickets_info_form.save(commit=False)
        tickets_info.user = self.request.user
        tickets_info.address = address
        tickets_info.save()        

        return redirect(reverse('tickets_info_list'))


My urls.py file

from django.conf.urls import url, patterns
from django.contrib.auth.decorators import login_required

from .views import TicketsWizardFormView, TICKETS_INFO_WIZARD_FORMS

urlpatterns = patterns(
    ...
    url(r'^tickets-info/request/$', login_required(TicketsWizardFormView.as_view(TICKETS_INFO_WIZARD_FORMS, name='tickets_info_request'),
)

This code is working fine, with to test it we need to add and change some things.

  1. Every time that we make a POST besides of send the data that each form, we also need to send the current step: [wizard_name]-current_step: [current_step]
  2. We need to change the fields name to: [step_name]-[field_name]: [value]

For example for our TicketsInfo Form:

data_tickets_info_form = {
    'Ticket Information-limit': 10,
    'Ticket Information-name': 'My first Ticket Info',
    'Ticket Information-pub_data': '2017-11-30T12:00:00',
    'ticket_wizard_form_view-current_step': 'Ticket Information'
}


In the above example we can see that we have added the [current_step] value and each field has the [step_name] prefix.

Now we are ready to pass our test:

# test_views.py

from django.test import TestCase

from django.core.urlresolvers import reverse

from django.contrib.auth.models import User


class TestViews(TestCase):

    fixtures = ['users.json']

    def setUp(self):
        self.client = Client()
        self.user = User.objects.first()

    def test_ticket_wizard_form(self):
        name = 'Awesome Tickets'
        limit = 10

        data_ticket_form = {
            'Ticket Information-limit': limit,
            'Ticket Information-name': name,
            'Ticket Information-pub_data': '2020-11-30T12:00:00',
            'ticket_wizard_form_view-current_step': 'Ticket Information'
        }

        data_address_form = {
            'Address-street_name': 'Isac Newton',
            'Address-zipcode': '2011NA',
            'Address-city': 'Pythonic Straat',
            'Address-country': 'Netherlands',
            'ticket_wizard_form_view-current_step': 'Address'
        }

        TICKETS_STEPS_DATA = [data_ticket_form, data_address_form]

        for step, data_step in enumerate(TICKETS_STEPS_DATA, 1):
            response = self.client.post(reverse('tickets_info_request'), data_step)

            if step == len(TICKETS_STEPS_DATA):
                # make sure that after the create ticket we are redirected to Ticket List Page
                self.assertRedirects(response, reverse('tickets_info_list'))
            else:
                self.assertEqual(response.status_code, 200)

        # get the ticket
        TicketInfo.objects.get(
            name=name,
            limit=limit,
            user=self.user
        )


And... The test pass :-)

....................................
----------------------------------------------------------------------
Ran 36 tests in 5.555s

OK

Conclusion:

Test a Form Wizard is not so hard as seems at the beginning!!

Creating your own framework with React

React

First we should know the basics of React:

  • Is the view layer.
  • Based on components.
  • A component must have a render method. The method must return a valid html tag (In React 16 you can return an array).
  • Each component can have props and state.


Difference between state and props:

Props: props (short for properties) are a Component's configuration, its options if you may. Props are received from above and are immutable as far as the Component which receives them is concerned. A Component cannot change its props, but it is responsible for putting together the props of its child Components.

State: The state starts with a default value when a Component is mounted, and then suffers from mutations in time (mostly generated from user events). It's a [*]serializable representation of one point in time a snapshot.

A Component manages its own state internally, but besides setting an initial state has no business fiddling with the state of its children. You could say that the state is private.

[*] We didn't say props are also serializable because it's pretty common to pass down callback functions through props.

The state is optional. Since state increases complexity and reduces predictability, a Component without state is preferable. Even though you clearly can't do without state in an interactive app, you should avoid having too many Stateful Components.


Resume of props ans state

- Props State
Can get initial value from parent Component? Yes Yes
Can be changed by parent Component? Yes No
Can set default values inside Component? Yes Yes
Can change inside Component? No Yes
Can set initial value for child Components? Yes Yes
Can change in child Components? Yes No


Redux

Redux is a predictable state container for JavaScript apps. It helps you to write applications that behave consistently, run in different environments (client, server, and native), and are easy to test. You can use Redux together with React, or with any other view library. It is tiny (2kB, including dependencies).


Creating the framework


The Architecture:


simple image1


The main key here is that exists only one store (one big Javascript object), that can be stored, usually in the local storage. This is a big immutable object . You must be familiar with the concept of immutability in Javascript. You can’t change any value of the store object.

Basically when something happens you might want to modify part of this big object, but don’t change it, just create a new object, change it, and return it. Where we do this functionality? In a reducer.

One big change is that you have to wrap the entire react application in a provider component. The provider component is listening at the store, and when it changes, a react component can be re-rendered.

simple image-routes

In the image we can see how to wrap the Application in the Provider component imported from react-redux.

Smart Components or Containers: Components that are connected to a portion of the store. They can trigger or fire actions.

Dumb Components: They are just normal components, can receive data as props from smart components.

The following piece of code is the LoginPage component. This is a smart component. Maybe you are wondering why…

simple login

Well... because we are connecting it with part of the store, also it can trigger actions. Actions are just javascript functions that dispatch an action. Actions are listened by reducers.

In the image below there is a login function (ES6 arrow function => ). The login receives data and dispatch something… an action with type equal to LOGIN_REQUESTED

simple image-routes

We can see a couple of things:

First of all we are importing connect. This allows us to connect a react component with the state object (store) and trigger actions.

The second is that we are importing a react component (LoginPage) and we are connecting it. So, now the component have access to part of the store (user) and we can trigger actions (login).

Now inside the LoginPage component we can use this.props.user, because we have access to a part of the store, in this case only the user. Also we can trigger the login action by doing this.props.login(). Then, this is a Smart Component.

Now the Dumb Component… and it is the LoginForm component. We are importing it in the LoginPage component.

It looks like:

simple image-login-form

If you take a look, when the button is clicked, we execute the function handleSubmit, and this function executes this.props.handleSubmit(). Yes, this is a props that was passed from the smart component. In other words, we are triggering the action login() that is listened by a reducer or a middleware.

In this case, the login function makes an AJAX request and it is intercepted by sagas middleware (User Sagas):

simple image-sagas

Sometimes actions are intercepted by a middleware. Here is saying: when the action LOGIN_REQUESTED is fired, execute the login generator (make an API call). If the api call was successful, then execute the loginSuccessful generator, that it triggers another action, in this case SET_TOKEN. Finally, the token is set in the reducer.

The following piece of code belongs to the user reducer.

simple image-reducer

Before dispatching the login action, the store object looks like:

simple image-console-1

After triggering the login() action, the store object looks like:

simple image-console-2

We can see how the store has been changed. Of course we have access to the user object in the LoginPage component via this.props.user. We can do cool things like verifying whether the user object has token or not. In case that has one, redirect our visitor to the Home Page, otherwise redirect to the Login Page again.

This is how we connect Sagas middleware, the store and the reducers:

simple image-store-index

We are exporting the store, and we are using it with the Provider Component. :-). Take a look at the step where I talk about the provider and you can see how we use the store

A special recommendation is that should have a balance between Smart Components and Dumb Components. You don’t want to have too many smart components because it implies to connect them to the store or a portion of it. At the same time if you have too many dumb components it means that you are passing props everywhere and it can be extremely hard to follow, especially because you can pass data through many levels (component 1-->component 2….--->component n)

Conclusion

Create your own framework with React can be a hard task at the beginning, but if you undestarnd the concept behind that you could replace the differents layers as much as you like according to your needs.

For example here I am using Redux for the data layer, but you can go for Flux or MobX. Also, an alternative for redux-sagas is redux-thunk.

This world is growing really fast with React, React Native, React VR, so be prepared...